The sample rate displayed on the device does not match the music file
The choice of music player app, the setting of music player and the setting of computer/phone will all have an impact on the sampling rate.
The sampling rate displayed by this unit is the sampling rate of the input signal, and it will not change the sampling rate by itself.
If the music player can be set to exclusive mode, the audio signal will not be resampled by the computer/phone, so the sampling rate of the output signal is the sampling rate of the original file, and the sampling rate displayed by this unit is also the sampling rate of the original file.
Because some players can't be set to exclusive mode, the audio signal will be resampled by the computer/phone and then output. So this unit will always display the sampling rate set by the computer/phone.
We recommend using Audirvana player on MAC OS and Foobar on windows OS.
How to show the sample rate
By default, the device shows the volume level. When the sample rate changes, it will briefly display the new sample rate before switching back to the volume display.
The sample rate will stay on the display only when the output volume is fixed at maximum and cannot be adjusted. To do this, set the output channel to Line Out and the decoding mode to DAC Mode.
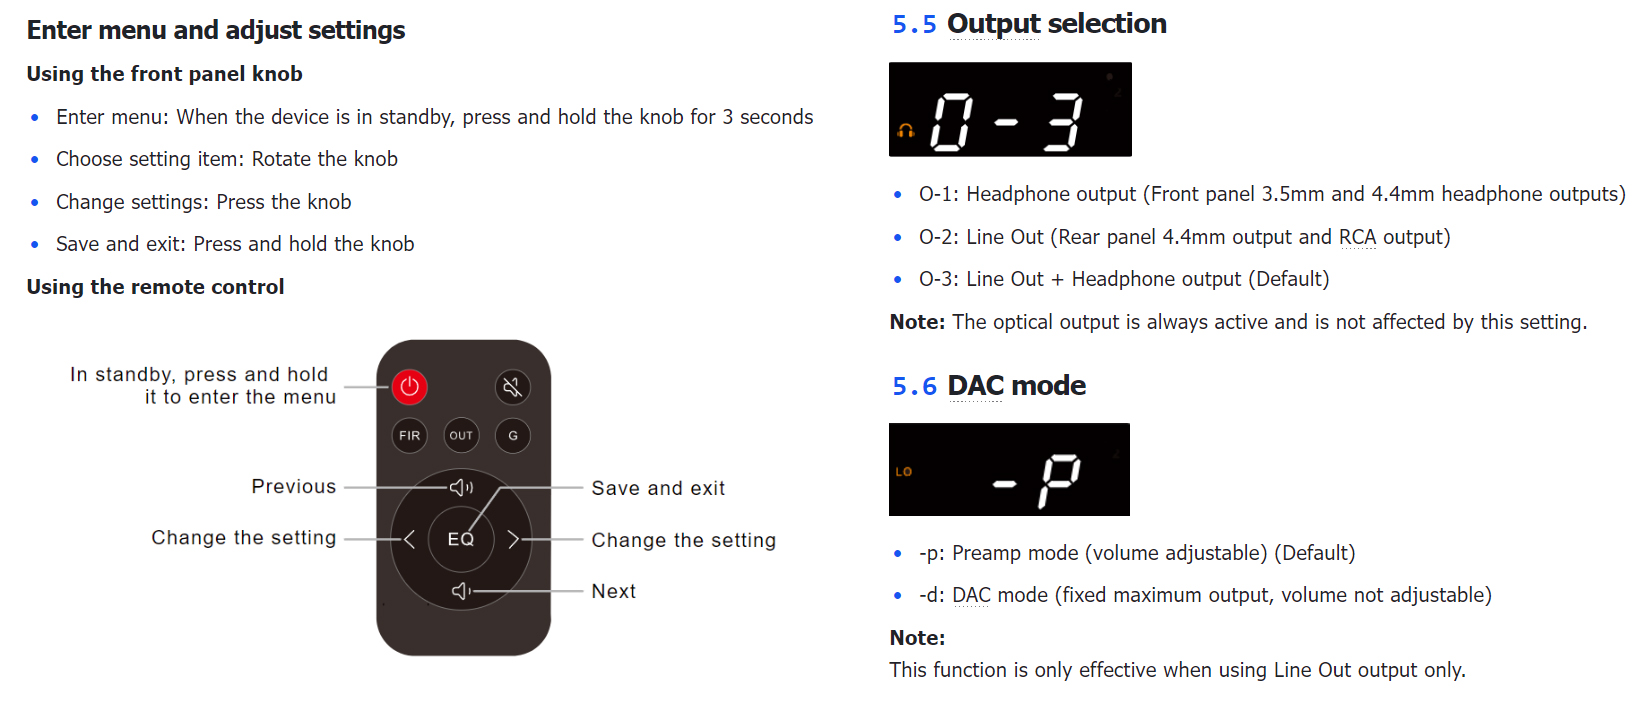
How to set DAC mode
Enter the setup menu, set the output channel to O-2 (Line Out), and set the DAC mode to m-d (DAC mode). After the settings are completed, save and exit the menu.
Does not power on with phone
The USB port on the DX1 II is used not only for audio data transmission, but also to power the device. Different phone brands and models may vary in terms of USB output current, OTG power supply policies, system permission management, and compatibility with external USB audio devices. As a result, some phones may be able to recognize and use the DX1 II normally, while others may fail to connect properly due to insufficient power supply or system compatibility limitations.
The DX1 II is primarily designed for use with computers. A computer’s USB port can usually provide a more stable and continuous power supply. When connecting the DX1 II to a mobile phone, you may consider using a Y-split USB cable, so that the DX1 II can be connected to the phone and an external power source at the same time.
Can't be turned on. The light is off.
· Check that the power connection is secure.
· Try a different 5V DC power adapter/test with another computer. When connecting to a computer, do not use a USB hub. Connect the device directly to a USB port on the back of the computer, and try other USB ports if needed.
· Try a different USB cable. Use a cable no longer than 1.5 m. A direct cable is recommended. Avoid adapters whenever possible.
Note: The USB port carries both data and power for the DX1 II. If the USB source does not provide enough power, the DX1 II may not turn on or may not work properly.
Microphone issues: no sound, low input volume, or noise
· Make sure the microphone opening is not blocked and the headset cable is securely connected.
· If you are using an adapter, splitter, or extension cable, try connecting the headset directly.
· Try unplugging and reconnecting the headset.
· Test with another headset. Make sure the headset uses the CTIA standard.
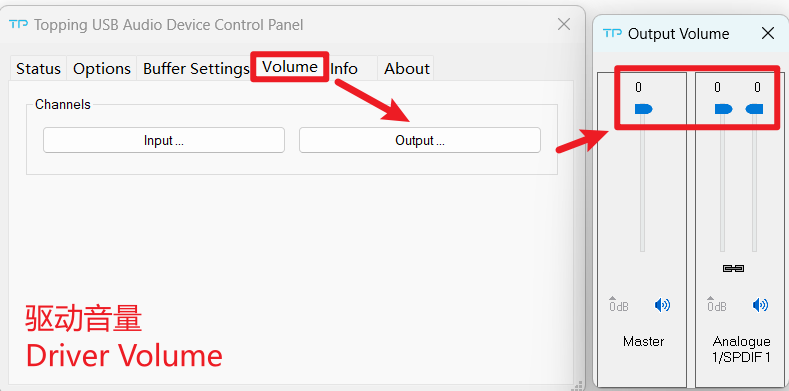
· Check and adjust the system volume, driver volume, and any related volume settings in the software you are using.
· The microphone input sample rate of the DX1 II must match the playback sample rate. Also note that the maximum supported sample rate for microphone input is 192 kHz.
https://www.toppingaudio.com/supports?search=DX1+II&tab=video-tutorial
· Check whether both the microphone input device and playback device in your software are set to DX1 II.
No sound
· Check the connections for all devices.
· Check whether the cable is fully inserted, and try using different cables for testing.
· Check that the proper input source is selected. Short-press the knob to switch inputs.
· Check the output setting. Double-press the knob to switch outputs.
· Check the volume of all devices and whether they are muted.
· Try disabling the PEQ function.
a, If the PEQ function is enabled and high-sample-rate muting is also active, sampling rates above 192kHz may be muted.
b, The PEQ gain settings might be too low, especially the pre-gain.
· USB IN:
a, Check the UAC setting on the rear panel. Use UAC2.0 by default. For devices that only support UAC1.0 (e.g., PlayStation), switch to UAC1.0 mode. Note that the setting takes effect only after unplugging and re-plugging the USB cable.
b, Select the default output device of your music player or computer as this unit.
c, Too low volume on PC. Please check and adjust the computer system volume, music player volume and driver volume.
· Optical output
a, Make sure the current audio format is within the supported range of the optical output. In particular, note that DoP64 is not supported in OPT d-1 mode.
b, Check whether the connected optical device supports the current audio format, especially DoP64.
Playback Noise, Stuttering, or Distortion
· Try with other songs.
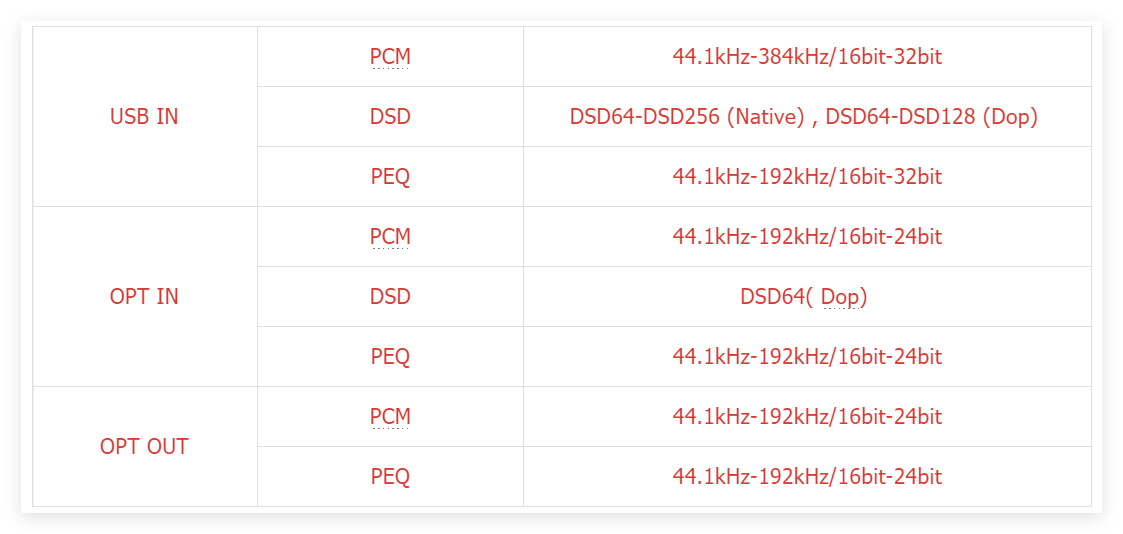
· The specifications of songs are not supported by this unit. The supported formats for the DX1 II are listed below.
· If the noise appears only when playing DSD files, please check and adjust the computer system volume, music player volume and driver volume to the maximum.
· If you experience distortion after enabling the PEQ function, it may be due to the preamp gain being set too high, causing signal overload. Please try gradually reducing the preamp gain until the distortion disappears completely.
· Do not use balanced-to-SE adapters/cables.
· Make sure the plug is fully inserted. A loose connection may cause issues or trigger protection.
· Check to see if the problem is with the source, downstream equipment and cables.
· If the noise disappears when the USB is powered by a 5V DC adapter instead of being connected to the computer, the computer is likely the source of the interference. In that case, try placing a USB isolator between the computer and the DAC.
One channel with noise/no output
· Do not use balanced-to-SE adapters/cables.
· Make sure the plug is fully inserted. A loose connection may cause issues or trigger protection.
· Try disabling the PEQ function to rule out any impact from the PEQ settings.
· Check to see if the problem is with the source, downstream equipment and cables. You can try swapping the left and right channel connections and try with another source.
Channel imbalance
· If the PEQ function is enabled, check whether it is due to different gain settings for the left and right channels.
· Check to see if the problem is with the source, downstream equipment and cables. You can try swapping the left and right channel connections and try with another source.
The connected USB device does not recognize this unit
· Do not use a USB hub. Connect the device directly to a USB port on the back of the computer, and try other USB ports if needed.
· Try a different USB cable. Use a cable no longer than 1.5 m. A direct cable is recommended. Avoid adapters whenever possible.
· Check the UAC setting on the rear panel. Use UAC2.0 by default. For devices that only support UAC1.0 (e.g., PlayStation), switch to UAC1.0 mode. Note that the setting takes effect only after unplugging and re-plugging the USB cable.
· May be caused by the PC. Check or try with another PC.
· If it is connected to mobile phone, it is caused by insufficient output current from the mobile phone, so it is recommended to connect it to a computer for use.
· Driver problem. Try to reinstall the driver.
Remote control not responding
· Enable remote control function in the setup menu first.
· Try to insert two fresh AAA batteries.
· Please aim at the remote control receiver.
· Bring the remote control close to the device.
· Use your Android phone's camera to look at the transmitter at the top of the remote. If it doesn't blink when you press the remote button, the remote is defective.
· If you have more than one Topping device, check that you are using the correct remote control.
Optical output volume cannot be adjusted
The optical output volume is fixed at maximum by default and is not affected by the volume control.
To enable volume adjustment, go to the setup menu and set the optical output volume mode to OPT U-2.
LO icon + Err / DSD icon + Err
Disconnect other devices and reboot. If the problem still persists, your unit may be defective. Please contact the store where you purchased it.